Flashrom
Flashrom is a versatile utility for managing flash chips, capable of identifying, reading, writing, verifying, and erasing them. It’s particularly adept at flashing BIOS/EFI/coreboot/firmware/optionROM images on a variety of hardware, including mainboards, network/graphics/storage controllers, and other programmer devices.
Warning
Use short & high-quality USB&Dupont cables. Long or low-quality cables can cause communication issues.Warning
Use VMs is not recommended, as it can cause communication issues.Key features include:
- Support for over 476 flash chips, 291 chipsets, 500 mainboards, 79 PCI devices, 17 USB devices, and a range of programmers via parallel/serial ports.
- Compatibility with parallel, LPC, FWH, and SPI flash interfaces, and various chip packages like DIP32, PLCC32, DIP8, SO8/SOIC8, TSOP32, TSOP40, TSOP48, BGA, and more.
- Operable without physical access; root access is typically sufficient, with some programmers not requiring it.
- No need for bootable media, keyboard, or monitor; capable of remote flashing via SSH.
- Allows flashing within a running system with no immediate reboot required; the new firmware activates on the next boot.
- Supports crossflashing and hotflashing, given electrical and logical compatibility of flash chips.
- Scriptable for simultaneous flashing across multiple machines.
- Faster than many vendor-specific flash tools.
- Portable across various operating systems including DOS, Linux, FreeBSD, NetBSD, OpenBSD, DragonFlyBSD, Solaris-like systems, Mac OS X, and other Unix-like OSes, as well as GNU Hurd. Partial Windows support is available, excluding internal programmer support."
Update Flashrom & Buzzpirat
Flashrom supports Buzzpirat out of the box
Ensure you have the latest stable firmware installed; learn how in the Firmware Update section.
Finally, make sure to use the latest development version of flashrom or our mod:
- Windows mod: https://github.com/therealdreg/flashrom_build_windows_x64
- mod code (For Unix): https://github.com/therealdreg/flashrom-dregmod
- Official repo: https://github.com/flashrom/flashrom
Help
A required dev parameter specifies the Buzzpirat device node and an optional spispeed parameter specifies the frequency of the SPI bus. The parameter delimiter is a comma. Syntax is:
flashrom -p buspirate_spi:dev=/dev/device,spispeed=frequency
where frequency can be 30k, 125k, 250k, 1M, 2M, 2.6M, 4M or 8M (in Hz). The default is the maximum frequency of 8 MHz.
The baud rate for communication between the host and the Buzzpirat can be specified with the optional serialspeed parameter. Syntax is:
flashrom -p buspirate_spi:serialspeed=baud
where baud can be 115200, 230400, 250000 or 2000000 (2M). The default is 2M baud.
An optional pullups parameter specifies the use of the Buzzpirat internal pull-up resistors. This may be needed if you are working with a flash ROM chip that you have physically removed from the board. Syntax is:
flashrom -p buspirate_spi:pullups=state
where state can be on or off.
When working with low-voltage chips, the internal 10k pull-ups of the Buzzpirat might be too high. In such cases, it’s necessary to create an external pull-up using lower-value resistors.
For this, you can use the hiz parameter. This way, the Buzzpirat will operate as an open drain. Syntax is:
flashrom -p buspirate_spi:hiz=state
where state can be on or off.
The state of the Buzzpirat power supply pins is controllable through an optional psus parameter. Syntax is:
flashrom -p buspirate_spi:psus=state
where state can be on or off. This allows the Buzzpirat to power the ROM chip directly. This may also be used to provide the required pullup voltage (when using the pullups option), by connecting the Buzzpirat’s Vpu input to the appropriate Vcc pin.
An optional aux parameter specifies the state of the Buzzpirat auxiliary pin. This may be used to drive the auxiliary pin high or low before a transfer. Syntax is:
flashrom -p buspirate_spi:aux=state
where state can be high or low. The default state is high.
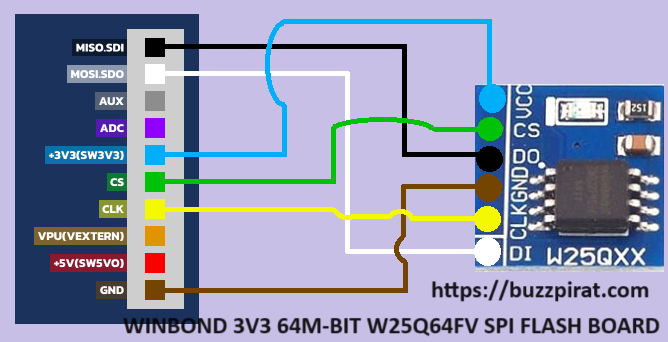
Tutorial Winbond 3v3 64M-BIT w25q64fv board
This board is included in our full kit for practice purposes. You can purchase another one on Aliexpress, Amazon, or eBay.

For this case, simply use the official Buzzpirat cables with the female Dupont connector they come with; there’s no need to use SMD IC clips. Connect the Buzzpirat to the w25q64fv board by attaching the +3v3(SW3V3) to VCC, CS to CS, MISO to DO, GND to GND, CLK to CLK, and MOSI to DI, ensuring each connection is secure for proper functionality
| Buzzpirat | w25q64fv board |
|---|---|
| +3v3(SW3V3) | VCC |
| CS | CS |
| MISO | DO |
| GND | GND |
| CLK | CLK |
| MOSI | DI |
To read the content of a flash memory chip using flashrom with Buzzpirat, execute the following command:
flashrom.exe --progress -V -c "W25Q64BV/W25Q64CV/W25Q64FV" -p buspirate_spi:dev=COM8,spispeed=1M,serialspeed=115200 -r flash_content.bin
--progress: This parameter shows the progress of the operation, providing visual feedback in the terminal.- -V: Stands for ‘verbose’. It increases the verbosity of the program, providing detailed output about the operations being performed. This is useful for debugging or getting more information about the process.
- -c “W25Q64BV/W25Q64CV/W25Q64FV” in flashrom is used to specify the exact model of the flash chip that you intend to interact with. When you run flashrom without the -c parameter, the tool attempts to automatically detect the types of flash memory chips that are present in your system.
- -p buspirate_spi: Specifies the programmer type. In this case, it’s set to buspirate_spi, indicating that the Buzzpirat is used for SPI (Serial Peripheral Interface) programming.
- dev=COM8: This part of the parameter specifies the device name.
Warning
COM8 refers to the COM port where the Buzzpirat is connected. This will vary depending on your system’s configuration. You can find the COM port number by opening the Device Manager in Windows and looking for the Bus Pirate device under the Ports (COM & LPT) section. - spispeed=1M: Sets the SPI communication speed to 1 MHz. Adjusting the SPI speed can be necessary depending on the flash chip’s specifications and the quality of the connections.
- serialspeed=115200: Sets the serial communication speed (baud rate) between the computer and the Buzzpirat to 115200 bits per second. This is a common baud rate for serial communication.
- dev=COM8: This part of the parameter specifies the device name.
- -r flash_content.bin: This part of the command tells flashrom to read the flash memory’s content and save it into a file named flash_content.bin
The read operation may take about 15 minutes to complete. Once it’s done, you can use a hex editor / binwalk etc to open the flash_content.bin file and inspect its contents.
To write the content of a flash memory chip using flashrom with Buzzpirat, execute the following command:
flashrom.exe --progress -V -c "W25Q64BV/W25Q64CV/W25Q64FV" -p buspirate_spi:dev=COM8,spispeed=1M,serialspeed=115200 -w flash_content.bin
The difference between the read and write commands is the -w parameter, which tells flashrom to write the content of the flash_content.bin file to the flash memory chip.
Warning
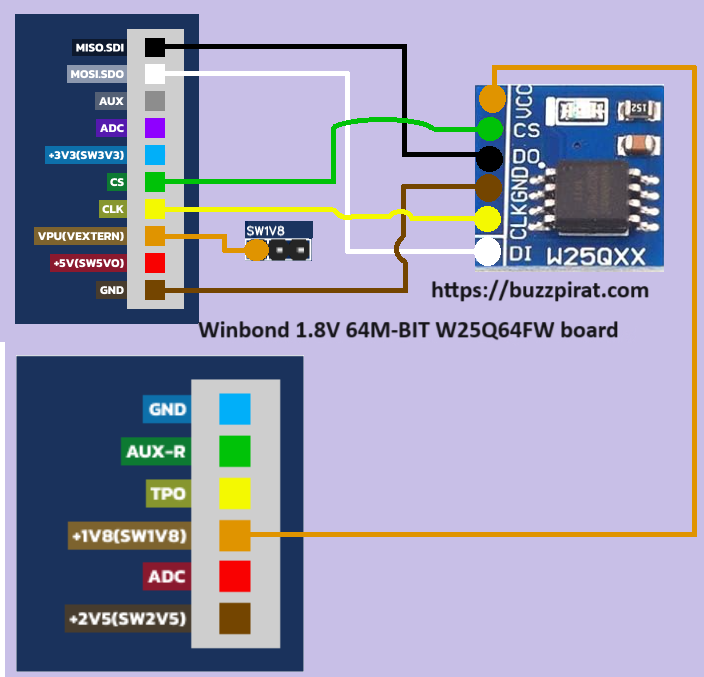
Warninng 1M can be too fast for some “setups”, try 250k or 125k if you have issues: spispeed=250k or spispeed=125kTutorial Winbond 1.8V 64M-BIT W25Q64FW board
After testing with the 3.3V memory, buy a 1.8V Winbond W25Q64FW. Desolder the 3.3V memory and solder the 1.8V one in its place. Ensure the chip’s orientation remains the same as the original one.
For this case, simply use the official Buzzpirat cables with the female Dupont connector they come with; there’s no need to use SMD IC clips. Connect the Buzzpirat to the w25q64fv board by attaching the +1v8(SW1V8) to VCC, CS to CS, MISO to DO, GND to GND, CLK to CLK, and MOSI to DI, ensuring each connection is secure for proper functionality.
Warning
Also, connect the VPU pin to a SW1V8 pin of the Buzzpirat.| Buzzpirat | w25q64fv board |
|---|---|
| +1v8(SW1V8) | VCC |
| CS | CS |
| MISO | DO |
| GND | GND |
| CLK | CLK |
| MOSI | DI |
| Buzzpirat | Buzzpirat |
|---|---|
| +1v8(SW1V8) | VPU |
Warning
It’s crucial not to use the Buzzpirat in 3.3V mode as it could endanger the 1.8V chips. Additionally, activating the BuzzPirate’s pull-ups is necessary to ensure everything operates at the voltage set in VPU pin (in this case, 1.8V). To do this, we must execute flashrom as follows:flashrom.exe --progress -V -c "W25Q64.W" -p buspirate_spi:dev=COM8,spispeed=30k,serialspeed=115200,pullups=on -r flash_content.bin
pullups=on means that the pull-ups are activated + the Buzzpirat is in hi-z mode.
Warning
COM8 refers to the COM port where the Buzzpirat is connected. This will vary depending on your system’s configuration. You can find the COM port number by opening the Device Manager in Windows and looking for the Bus Pirate device under the Ports (COM & LPT) section.The read operation may take about 15 minutes to complete. Once it’s done, you can use a hex editor / binwalk etc to open the flash_content.bin file and inspect its contents.